Sunday, December 29, 2013

How to make bootable pendrive

A lot of linux distributions are there to choose and they releases every day. So it is difficult to choose one without testing first. You can not burn a CD or DVD every time to check the live image released of a distribution.


For Windows Users:
Well there are plenty of tools available there. If you are using windows then there is a great tool called YUMI - Multiboot USB creator. As name suggest you can make a pendrive multi-bootable with YUMI. You can download the tool from here and start testing it.

For Linux Users:
If you are using linux then most of the popular distributions are providing there own tool to make bootable pendrive.

On Fedora install liveusb-creator using
yum install liveusb-creator
and run the application. It is very interactive.

On Ubuntu run the program Startup Disk Creator which is used to create bootable pendrive.

There are a lot of other distributions and there programs. But there is one command for terminal which run on all distribution and is very easy to use.

dd command:
Open the terminal and become super user(su for Fedora or sudo before command for user more linux like Ubuntu, Mint).
Before running the command check the device partition of your USB pendrive by


ls -la /dev/disk/by-label

This command will show the label of your partitions and the disk vol. like sda1, sdb3. Your pendrive might have only one partition and there will be adb1 or adc1 only for that. Whatever it is use that sdc or sdd or sdb without the number in below command instead of sdX.
Please be carefull before using the below command. make sure you are using right partition before running command. dd is very strong command and it will destroy entire partition and write the iso file there. It will not show any warning or ask you to confirm once press enter.
 

sudo dd if=/home/user/directory/diskimage.iso of=/dev/sdX

Here dd is command, if means input file and of means output file.  


Friday, December 27, 2013

Linux Mint 16 XFCE installation guide with snapshots and Review

Linux Mint released XFCE Desktop Environment of its Version 16. Its an extremely fast and wonderful Desktop providing a lot of lot of softwares like media codecs and flash-plugin OUT of the BOX. XFCE is a lightweight environment and good if your system hardware are not up to mark as latest core i series or higher RAM.

Here we will see how to install Linux Mint 16 XFCE on your desktop or laptop.

1. First download you Mint 16 XFCE from here and  burn it to a DVD or make bootable pendrive. Now boot your PC with the bootable drive.


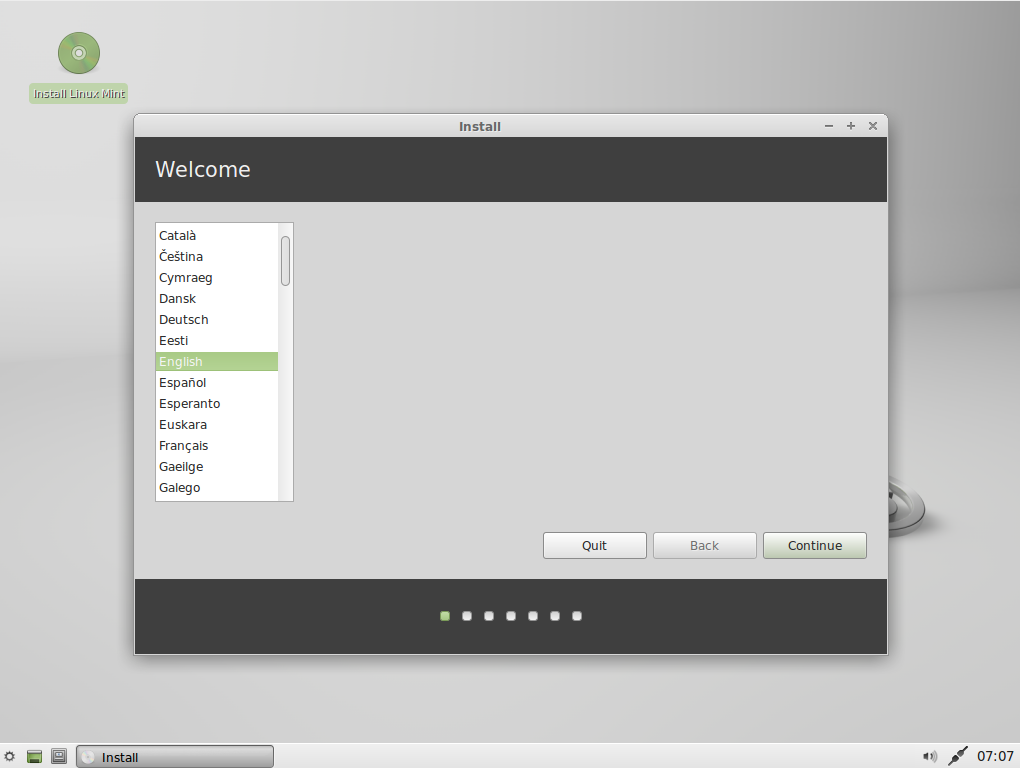
 2. After booting a screen like below will be seen. On top left there is an CD icon labeling "Install Linux Mint" Double click on it and a window will ask for language. Select your language.


3. If everything is fine then it will allow you to click "Continue" on the window below.


4. If you have nothing else on your Hard drive and just want Linux then select first option or if you want to install it along with :Windows OS" then select "Something Else".


 5. It is easy here to create your own partition table unlike Fedora. If you are having free space then just click on "+" sign and add partitions. otherwise select partitions and click on change. In any case you have give mount-point and format. There are only two partitions which are necessary. /(root) and swap. But I would like to suggest four.

If you are having a Hard-drive of more then 500 GB then I would like to suggest these partitions with suggested size:
(i) / of 30 to 50 GB   ext4 format (Minimum 10 GB)
(ii) /boot 1 to 2 GB ext4 format (Minimum 200 MB)
(iii) linux-swap 4 to 10 GB (Remember .. swap is not mount point.. You have to select format as SWAP instead of ext4)
(iv) /home 20 to 50 GB ext4 format


 6. After continue select you location, keyboard layout and create your User account while Mint is installing in background.


 7. Linux Mint installation in progress.


 8. Installation completed. You can explore more on live CD but any change will be discarded as soon as you reboot. So reboot the system to fresh installation.


 9. Login screen. click your login name and give password.


 10. Various snapshots of the screen with different applications and arrangements.


Linux Mint 16 XFCE is a good combination of packages from Ubuntu repo and there own developed desktop interface on top of XFCE environment. It is really easy to use if you are first time using linux as it has Windows like bottom panel with fast response. Easy to use Software Installation utilities and automatic updater with information providing on safe to install giving rating from 1 to 5. 1 being extremely recommended and 5 being on your  risk.

Pros:
1. The desktop interface on top of XFCE which is easy to use and gives fast response.
2. Contains packages from XFCE group which are faster for old systems.
3. Most of the media codecs and flash-plugin are available out of the box.

Cons:
We have found none but we would like to mention that Mint is supported until the next release and they do not have a upgrade method. However you can still upgrade by first changing the repo to newer version and then running

sudo apt-get update && sudo apt-get dist-upgrade
sudo apt-get upgrade


But it is riskier.

Verdict: Linux Mint is awesome distribution and one should go through it. If you are newer you will be amazed by its speed and if you are using Linux for a long then just give it a try., It will not let you down.

Thursday, December 26, 2013

Step by step guide to install fedora 20 with screenshots

Hi All,

Fedora 20 released on December 17, 2013. Its an awesome distribution with a lots of cutting edge features. I will start the guide with some screenshots and explain each step.

1. First of all Download Fedora 20 from the site. I have downloaded desktop (Gnome) format but the procedure is same for all the formats. Burn the image to a DVD or CD or make a bootable pendrive. Boot the system with the bootable pendrive. You will see a the screen shown as below.


2. Press enter to Start Fedora Live.


3. It will ask you to try Fedora before installing or install to Hard Drive.


4. If you choose to try the it will inform you where the install option will be for future reference to install.


5. If you choose to install on Hard Drive or later clicked that switch then it will ask you for language selection.


6. Then it will show you a screen where you have to set your location for date/time and keyboard layout, Installation destination and host-name(Network Configuration). REMEMBER the DONE switch is top left on every screen.


7. Clicking on installation destination it will ask you to select the disk. Click DONE. If you have empty Hard Drive and want to install only fedora then choose automatically, otherwise select manual partition option.


8. Please read it carefully. You may end-up corrupting your existing windows installations. do not choose any partition about which you are not sure. Go back to window and see the labels and then come back again here.

8.1 Here is the tricky part. It is not simple to understand for first timer. But it is fairly easy. It does not show you the disk layout in a graphical cylinder, so you need some information about your disk before installation. If you have free space that there is no problem. Just click on "+" sign and add the partition for fresh fedora installation. You need to specify the size, mount-point, file system to format.

8.2 Or if you have some partitions which you want to use for fedora installation then click on that partition specify the options on right side as mount-point, and reformat as ext4(preferred).

8.3 If you have hard-drive of 500GB or more then I would like to suggest the partitions as
/boot (2GB) as ext4
/ (35 GB) as ext4 === root
linux-swap from 4 GB to 10 GB -- for this you have to select reformat as swap
/home (20 GB) as ext4


9. Click Begin Installation.


10. You will see a screen where fedora installation is going in background and asking you to set root and users.


11. Set root password. If password does not match it will warn you like the yellow line below.


12. Then Set the user. Here user Aishwarya Rai and her password is set. if password is too weak like abhishek here then it will warn you like yellow line below. You have to click on DONE again at top left.


13. The installation is going on.


14. Click on Quit as installation completed. You can use live session user as long as after quitting also. You need to restart the system by clicking top right.


15. After rebooting, log-in with your user name. Here are some of the screen-shots of the fresh fedora installation. However I have installed some shell extensions and cairo-dock so it looked more attractive. I have also changed desktop background to one of my favourite pic taken by me.


Enjoy the ride and see other posts for doing more. fun with fedora after installation.

Friday, January 25, 2013

Install more Desktop Environments on Fedora 20

How to install other popular desktop environment on Fedora 20?

Here we go....

You can copy and paste the content of the box below in a file with extension .sh and run it after making it executable

Click here to download the file.

#First of all make this file as executable program by running command "chmod a+x desktops.sh"
#you can remove any command below if you do not want to install that desktop
#Make sure you are in super user mode (by running command su) before running this file using "./desktops.sh"


#GNOME Desktop
yum groupinstall "GNOME Desktop"

#KDE Desktop:
yum groupinstall "KDE Plasma Workspaces"

#Mate Desktop
yum groupinstall "MATE Desktop"
 
#Cinnamon Desktop
yum groupinstall "Cinnamon Desktop"
 
#XFCE Desktop
yum groupinstall "Xfce Desktop"
 
#LXDE Desktop
yum groupinstall "LXDE Desktop"
 
#Sugar on a Stick
yum groupinstall "Sugar Desktop Environment"

Thursday, January 17, 2013

Things to do after installing Fedora 20

The latest version of fedora released on December 17, 2013. It is very stable and improved version of the previous release.

We know that fedora does not provide licensed and non-free codecs and packages. So we need to install them.

Copy all the content in the box below and make a file with extension .sh (I used fedoraup.sh) or you can do all these things manually also referring the box below.

Click here to download the file and run.

#First of all make this file as executable program by running command "chmod a+x fedoraup.sh"

#you can remove any command below if you do not want to install that package

#Make sure you are in super user mode (by running command su) before running this file using "./fedoraup.sh"

yum -y update

#Install gnome-tweak-tool

yum -y install gnome-tweak-tool

#WGET

yum -y install wget

#rpmfusion

su -c 'yum localinstall --nogpgcheck http://download1.rpmfusion.org/free/fedora/rpmfusion-free-release-$(rpm -E %fedora).noarch.rpm http://download1.rpmfusion.org/nonfree/fedora/rpmfusion-nonfree-release-$(rpm -E %fedora).noarch.rpm'

#Media codecs

yum -y install gstreamer gstreamer-plugins-good ffmpeg-libs xine-lib xine-lib-extras xine-lib-extras-freeworld xine-ui xine-ui-skins gxine gstreamer-plugins-bad gstreamer-plugins-bad-free-extras gstreamer-plugins-bad-nonfree gstreamer-plugins-ugly gstreamer-ffmpeg gstreamer1-libav gstreamer1-plugins-bad-free-extras gstreamer1-plugins-bad-freeworld gstreamer1-plugins-base-tools gstreamer1-plugins-good-extras gstreamer1-plugins-ugly gstreamer1-plugins-bad-free gstreamer1-plugins-good gstreamer1-plugins-base gstreamer1 ffmpeg libdvdread libdvdnav lsdvd libdvdcss

#vlc and SMPlayer for Video

yum -y install vlc smplayer

#Music player banshee

yum -y install banshee

#xbmc and minitube

yum -y install xbmc minitube

#rar utilities

yum -y install unrar p7zip p7zip-plugins

#filezilla

yum -y install filezilla

#flash player

yum -y install http://linuxdownload.adobe.com/adobe-release/adobe-release-x86_64-1.0-1.noarch.rpm

rpm --import /etc/pki/rpm-gpg/RPM-GPG-KEY-adobe-linux

yum -y install flash-plugin nspluginwrapper alsa-plugins-pulseaudio libcurl

#Google Chrome

yum -y install https://dl.google.com/linux/direct/google-chrome-stable_current_x86_64.rpm

#Google-talk plugin

yum -y install https://dl.google.com/linux/direct/google-talkplugin_current_x86_64.rpm


After installing gnome-tweak-tool you can run the application and add minimize and maximize buttons on the windows by switching ON maximize and minimize buttons on the titlebar in Windows option which is second last


Thats all you need to do.